If you’re experiencing problems with your water heater, you can usually take a few steps to keep the problem from worsening until your plumber arrives. Start by checking your breaker box to see if the breaker is tripped or blown.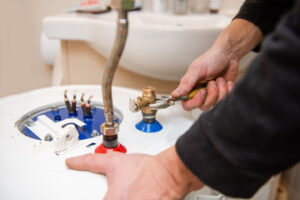
If it is, flip it back on. If not, call the experts at Denver Water Heater Repair.
Thermostats play an important role in water heater safety. Their function is to shut off the power to your water heater elements if the temperature inside the tank rises to dangerous levels. If your thermostat is faulty, you may experience high-temperature shutdowns. Thermostats can be defective for various reasons, including mineral buildup, clogged vents, and wiring problems. It’s a good idea to resolve these issues as soon as possible to avoid serious problems in the future.
To test the functionality of your thermostat, try lowering its setting. If you do so and notice that your hot water is still too hot, your thermostat might be faulty. If the lower setting still causes your water to heat too quickly, it’s likely time to replace it.
Fortunately, replacing a thermostat is a relatively easy DIY task. After turning off the power to your heater, you can disconnect the wires from the upper and lower thermostats. You can then unscrew the old thermostat from the tank and screw the new one in place with your hands or pliers. To ensure that the new thermostat fits correctly, you can also find a model that’s designed to fit your water heater on websites like Amazon.
If your thermostat is faulty, you can perform several troubleshooting tests to see if it’s actually broken or just not working properly. You can also try bridging two of the terminals together to test their functionality. If your water heater stops cycling when you bridge the terminals, it’s probably a good idea to replace it.
A faulty thermostat is the most common cause of high-temperature shutdowns. However, there are some other problems that can lead to these issues, such as a clogged vent, a damaged heating element, or a rusty water tank. Regular maintenance and cleaning can help prevent these problems from developing. Cleaning the air vent regularly is a good way to prevent mineral buildup, and it’s important to check and replace the sacrificial anode rod every three to five years. You can purchase a new sacrificial anode rod at most hardware stores, home centers, or plumber’s wholesalers.
Damaged Heating Element
If your water heater isn’t producing hot water, the heating element may have burned out. If it’s a gas water heater, the pilot light may also be out. However, this is less likely to be the case since relighting a pilot light takes much more work than replacing a damaged heating element. If you do find that the pilot light is out, it’s important to follow the safety manual carefully and not try to relight it without doing so. This is dangerous and can lead to a fire or explosion. The pilot light is important to keep the gas control valve open, allowing the gas to flow and heat the water. The temperature sensor also needs to be working properly, as does the thermocouple if your tank is gas.
If you have an electric water heater, the first thing to check is that the circuit breaker that corresponds to the water heater has not tripped. Then, press the reset button on the high-temperature cutoff switch located just above the upper thermostat to see if that solves the problem.
The next step is to test the functionality of the heating elements. You can do this by using a multimeter set to the lowest ohms setting. Touch the red probe of the multimeter to one of the screw terminals on the element, and the black probe to the other screw terminal. If the reading is below 30 ohms, the element is faulty and should be replaced. Repeat this process on the bottom heating element if your water heater has two.
You can replace the element yourself if you’re comfortable handling electrical and plumbing work. However, if you aren’t comfortable doing this, or are unsure about your abilities, it is best to have the element replaced by a professional. When purchasing the new element, it should match the length, mounting type (screw-in or flange), and wattage of the old one to ensure a perfect fit.
Once you’ve removed the old element and replaced it, start up the water heater to see if you have hot water. If not, you may need to replace the thermostats or the water heater cutoff switch.
Rusty Tank
A rusty tank is not just unsightly, it’s a sign that your water heater may be about to fail. Even if your tank isn’t leaking, a rusty one exposes the metal to oxygen from the air and this is what causes corrosion and leaks. A quality water heater usually lasts for about 10 years. If yours is close to this age it is a good idea to research replacing it to avoid not having hot water or a flood caused by a failing water heater.
A few rust flakes on the tank’s surface are normal, but if you see a lot of rust or a rusty tank cap, it means that the water inside is corrosive. This is usually a sign that the anode rod is going bad and needs to be replaced.
The anode rod is a piece of metal that goes through the center of your water heater tank. It is designed to attract corrosive elements from the water that would otherwise attack and erode your water heater tank. The anode rod can go bad from normal use, or it can be accelerated by hard water with excessive mineral content.
If you find that your water has a red or brownish tint to it or that you notice a metallic scent when it’s running, this is a sign that there is rust in the tank and/or pipes. Fortunately, this can often be remedied by shocking the system with a chlorine treatment or flushing the system.
To start, shut off the water to your home and drain the water heater. Then open the tank hatch and take a look inside. If there is a lot of rust or flaking you will need to scrub the inside of the tank with a stiff brush and scouring pad. Then rinse the inside of the tank with water, dry it and seal the openings to the tank with GOOD duct tape. Next, pour in a pint of naval jelly or any other phosphoric acid formulation such as milk stone remover or tile haze remover. This will coat the inside of your tank with iron phosphate which is somewhat rust resistant.
Damaged Pressure Valve
The pressure relief valve, or TPR valve, is one of the most important safety components on a water heater. It’s designed to open if the pressure inside of your tank gets too high, protecting your home and your family from a possible explosion. However, this valve can be damaged for a number of reasons, including age, poor installation, and excessive wear. If your TPR valve is damaged, you should replace it as soon as possible to prevent a leaky water heater.
When the valve is working correctly, it will release a little bit of water whenever the temperature or pressure in the tank gets too high. This water will escape through the valve and out of the pipe at the top of the tank, lowering the temperature and pressure back to safe levels. But, if the valve becomes defective or damaged, it can’t release excess pressure and the buildup could cause the tank to explode.
A faulty or damaged pressure valve can also result in a lot of water getting into your home, damaging the piping and water heater itself. This is why it’s important to regularly check your water heater for any signs that the pressure relief valve isn’t functioning properly.
If you hear rattling sounds coming from your water heater, this is a clear sign that the pressure in your tank has gotten too high and that the valve isn’t opening correctly. Excessive debris in the water is another sign that your valve needs to be replaced.
Replacing your pressure valve is a simple process, but it should only be done by a professional plumber. To start, turn off the gas to your water heater or flip the breaker if it’s electric. Next, close the cold water cut-off valve that runs to your heater and drain any water that’s in the overflow pipe by opening a tap or drain valve that’s lower than the location of the valve. Then, use a wrench to unscrew the old valve. Measure the distance from the bottom of the tank to the overflow pipe and cut a new length of 3/4-inch CPVC pipe to that measurement, making sure it matches the diameter of the valve’s exhaust port. Screw the new valve into place, wrapping Teflon tape around it as you do so.